Checking a bag at the airport can seem like a daunting task, but with proper preparation, it can be a breeze. Maybe you’ve never traveled by plane before, or it could be some time since you last flew. This post will guide you to help make your experience as smooth and stress-free as possible. Even if you’re a regular traveler, you’ll hopefully pick a tip or two from this post.
Key Points
- Check the Transportation Security Administration (TSA) and your airline for restricted or prohibited items.
- Measure and weigh your bag before you leave for the airport.
- Check that your luggage stubs match your flight details.
Prepare Your Bag for Check-In
The best offence is a good defense, and getting your bag ready for check-in is no exception. This will make the check-in process at the airport run more smoothly.
Pack Your Bag Properly
It’s always a good idea to check that you haven’t packed any items that are restricted or prohibited. Common sense is always a good guide.
Having said that, the Transportation Security Administration (TSA) lists rocket launchers as an item which is prohibited in luggage. This does make me wonder what set of circumstances led to the TSA having to explicitly specify rocket launchers as a banned item. (Editor: This is why TSA feels the need to specify rocket launchers).
Other items aren’t as obvious. For example, alcoholic beverages with more than 70% alcohol content are prohibited.
I strongly recommend that you check the TSA’s website for restricted and prohibited items.
You should also check your airline’s restrictions, as it may restrict more items. You can find this information on the airline’s website.
Check Your Airline’s Bag Size and Weight Allowance
Each airline has rules and regulations when it comes to checked baggage. The reservation email from your airline will include the size and weight limits that applies for your specific trip.
Checked Bag Size Limit
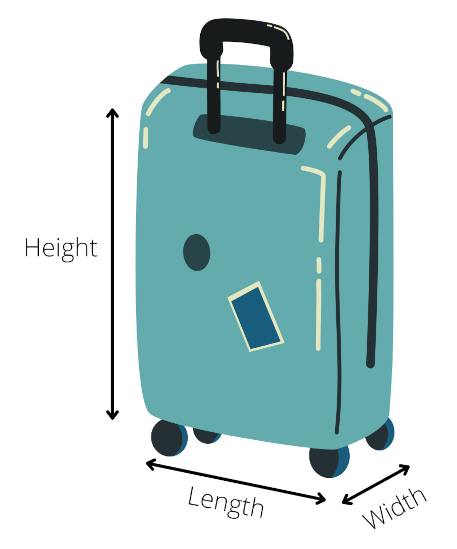
Most airlines impose a bag size limit of 62 linear inches (158 centimeters) for checked bags (Allegiant Air is a notable exception). If your bag is larger than 62 linear inches, your airline may charge an oversize fee.
You determine your checked bag’s size by measuring its outside length, width, and height, then adding these measurements together. Be sure to include any protruding wheels, handles, or straps in your measurements (However, Southwest has the distinction of not including wheels when measuring your bag).
Checked Bag Weight Limit
Many airlines allow your checked bags to weigh up to 50 pounds (23 kilograms) without attracting overweight baggage fees. However, many ultra-low-cost carriers have decreased this weight limit to 40 pounds (18.1 kilograms). If your checked bag exceeds the airline’s weight limit, your bag may be suject to an overweight fee.
To weigh your bag at home, you can use a bathroom scale. You can try sitting your bag directly on the scale and take a weight reading. If your bag doesn’t sit on the scale without toppling over or touching the floor, you can weigh your bag using an indirect method. Firstly, weigh yourself on the scale. After you stop crying from the shock of your weight (or maybe that’s just me), weigh yourself while holding your bag. Then, to calculate the weight of your bag, simply subtract your weight from the weight of you holding your bag.
A much easier way to weigh your bag is to use a luggage scale. It’s also more accurate (and causes less crying).
Label Your Bag
Make sure your bag is properly labeled with your name and phone number. You should attach a luggage tag on your bag with this information.
Take Photos of Your Packed Bag
It’s always a good idea to take a photo of your packed bag. While you’re at it, also take a photo of the inside of your packed bag. This will help if your bag is delayed or damaged during transit. A picture is worth a thousand words.
Check In and Pay Your Bag Fees Online
To save time, and potentially save cash, you can pay for any applicable baggage fees online, before you arrive at the airport. In most cases, you will have to pay for your bags at least 24 hours prior to your flight’s scheduled departure.
Check Your Flight Status
Before you leave the airport, check the flight status to make sure there are no delays or cancellations.
Arrive At the Airport Early
It’s recommended to arrive at least 2 hours before your flight for domestic flights and 3 hours for international flights. This will give you enough time to check in, drop off your bags, and go through security.
At the Airport
This is where all your prep work will pay off. Checking in your bag at the airport will be a breeze!
Find The Check-In Counter
Look for signs directing you to the check-in counter of your airline. The airline’s name will be prominently displayed.
If you’ve already checked in online, you can go straight to the baggage drop-off area. If you haven’t checked in yet, go to the airline’s check-in counter to get your boarding pass and check your bag.
Show Your ID And Boarding Pass
Once you reach the check-in counter, present your government-issued ID and boarding pass to the agent. They will verify your information and help you with the check-in process.
The counter agent will confirm that you haven’t packed any prohibited items in your bag.
The Counter Agent Weighs Your Bags
The check-in agent will weigh your bags to make sure they meet the weight restrictions set by the airline. If your bags are overweight, you may be charged a fee.
I always make note of the weight recorded at the check-in counter. This gives me a good idea as to how well my luggage scale compares to the airline’s.
The Counter Agent Attaches Tags Your Bags
The check-in agent will then tag your bags. In some circumstances, the agent may ask you to write your personal contact information on the tags before they are attached to your bags.
Pay Any Baggage Fees
If your bags are oversize, overweight or if you have excess baggage, you’ll be required to pay a fee. Most airlines prefer credit or debit cards for payment, instead of cash.
Drop Off Your Bags
After paying any baggage fees, you’ll be able to drop off your bags with the check-in agent. They’ll take care of the rest and send your bags to your final destination. If your itinerary includes a connecting flight, confirm with the agent that your bag will be checked through.
Get Your Baggage Receipts
Make sure to collect your baggage stubs from the check-in agent. This will help you track your bags in case they get lost or delayed during your flight.
Hot Tip: Always check that the information on the bag stubs matches your flight details. Also, take a photo of them, in case you misplace them. These receipts are useful if your bag goes missing while in transit.
Get Your Boarding Pass
After you’ve dropped off your bags, you’ll need to go through security and then head to your gate. Be sure to keep your boarding pass with you, as you’ll need it to board the plane.
Final Thoughts
As you can see, preparation is the key to ensuring that you have a smooth and stress-free experience when checking your bag at the airport. Let’s quickly summarize where the preparation pays off:
- Check TSA, FAA, and your airline’s restricted and prohibited items list to ensure that your bag isn’t flagged by security for holding anything that it shouldn’t.
- Pay your bag fees online before you reach the airport: No need to pull out your credit card at the check-in counter to pay for your bag. You may even save a few dollars by paying your bag fees early.
- Measure and weigh your bag before you arrive at the airport: Avoid oversize and bag fees by ensuring that your suitcase is within your airline’s checked baggage limits.
- Take a photo of your bags after they are packed. This will help to find and identify them if they go missing.
- Tag your bag with your personal information to ensure that your bag can be returned to you if it’s delayed in transit.
- Check that your bag stubs match your flight details. Also, take a photo of them in case they are misplaced.
Checking your bags at the airport doesn’t have to be complicated. Just follow these steps and you’ll be on your way to a stress-free travel experience.
Sources